KLsunderground
371 Watchers84 Deviations
27.2K
Pageviews Journals3
Newest
some goodbyes.
2 min read
hi guys. it's me again, KLsunderground. long time no see huh? nice to see you guys again.
i'm here to annouce that i decided to stop (designing) for awhile to focus on my goals and my university life in the U.S.
it was really nice to have so much friendly friends, amazing newbies (Vietnamese) and my forever beloved sisters and brothers.
i came here about 2-3 years ago and i must admit that it was such a great time to meet new friends, find out my inspirations and finally make my mind clear about this design world.
i saw many ups and downs in your life, in my life as a fan, as a designer, as a watcher, as a friend and as a person that wants to do many things to show other people see our colorful and creative way of thinking by designing.
i mean, thank you so much for your support, your comments. i'm really glad that i had a chance to live my life freely and artistry at this site. (Smile)") however, everyone has their own story. we have to focus on our targets and to show our passion in our career. luckly that i have decided to work in this fabulous entertainment as a public relation speacialist.
however, everyone has their own story. we have to focus on our targets and to show our passion in our career. luckly that i have decided to work in this fabulous entertainment as a public relation speacialist.
so, i will see you guys really soon not only as a designer but aslo as a representative.
see you guys really really soon and keep moving forward! i will be here all the time to have an eye on every of you
June 16th 2014
yours truly,
KLsunderground.
i'm here to annouce that i decided to stop (designing) for awhile to focus on my goals and my university life in the U.S.
it was really nice to have so much friendly friends, amazing newbies (Vietnamese) and my forever beloved sisters and brothers.
i came here about 2-3 years ago and i must admit that it was such a great time to meet new friends, find out my inspirations and finally make my mind clear about this design world.
i saw many ups and downs in your life, in my life as a fan, as a designer, as a watcher, as a friend and as a person that wants to do many things to show other people see our colorful and creative way of thinking by designing.
i mean, thank you so much for your support, your comments. i'm really glad that i had a chance to live my life freely and artistry at this site.
so, i will see you guys really soon not only as a designer but aslo as a representative.
see you guys really really soon and keep moving forward! i will be here all the time to have an eye on every of you
June 16th 2014
yours truly,
KLsunderground.
Join the community to add your comment. Already a deviant? Log In
1st lesson Abstract style
1 min read
[sorry this is just for Vietnamese =,=. i'll translate in English soon ~]
Abstract style.
Written by: KLsunderground @ dA
aka Krisswagg
there's some errors that i can't firgue it out so i'll pass it in a file for you to download it.
but remember credit for me (Wink)")
thanks.
dl here : www.mediafire.com/view/?zr6ust…
if you have any questions or you might not understand something , just leave me a note or message, i'll reply and explain more
Abstract style.
Written by: KLsunderground @ dA
aka Krisswagg
there's some errors that i can't firgue it out so i'll pass it in a file for you to download it.
but remember credit for me
thanks.
dl here : www.mediafire.com/view/?zr6ust…
if you have any questions or you might not understand something , just leave me a note or message, i'll reply and explain more
Join the community to add your comment. Already a deviant? Log In
tut 01 Smashing and oppositive's style
4 min read
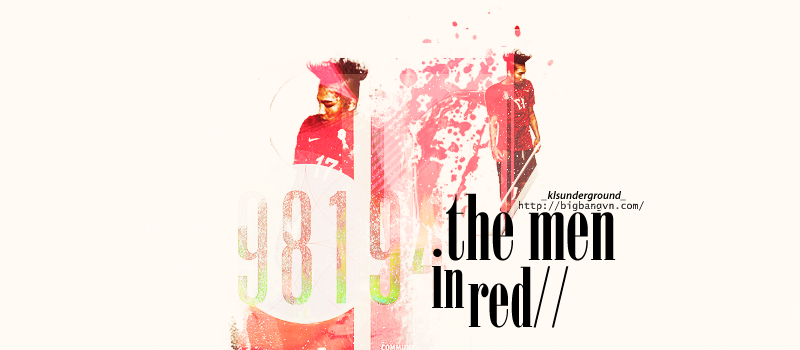
Smashing and oppositive's style
Officially written by Krisswagg aka Klsunderground @ dA
DON'T COPY OR RE-WRITTEN WITHOUT MY PERMISSION.
{ This is a part of my designing style. So I just write it in a simple way to make sure that ya'll know clearly bout this}
THIS STYLE IS JUST ABOUT YOUR IMAGINATION AND Dos OF YOUR DESIGN. It's maybe not like my artwork but it's still have such common come from this style. Thanks.
Stock : BIGBANG'S TAEYANG. i.imgur.com/9yn2d.jpg
Texture : thanks @ dA
Brush : www.mediafire.com/?ww460dcukh8… ; www.mediafire.com/?d6rkb7cc982…
1. OPEN the stock(s). Use Pen Tool (L) or Quick Select Tool (W) to take the mod out of the backround. And then drag it into the position that you want it to. Named it : Layer 1.
2. Dup Layer 1 to Layer 2 and Layer 3. Layer 1 : normal – 100 % - sharpen. Layer 2 : normal – 100 % . Layer 3 : screen – 90 %.
* Layer 1 : Want to check the name of those brush : click to that brush that i gave you below -> rename this brush .
-2.1 : Use Pennello campione 1's brush – 400 with color #d13232 and put the first brush on the right side and brush once. Then go to the second right side near TAEYANG's right hand – brush another one. Make sure that you keep that Layer not being absolutely clear after erase piecies after done with the brushes.
-2.2: Use Sampled Brush 1563's brush - 400 Then use color: # 000000 and do whatever you like at the bottom of the mod. But do it slightly and not too much.
* Layer 2: < if you don't want to do anything with Layer 2 and just want it simple, so all you have to do is set it normal and doing nothing.> You have to erase almost all of the body of TAEYANG and you just have to use the right side of his body <include arms, legs and head. Use Pennello campione 2's – 400 with color # ad2626 and do it freely like 2.1.
3. Using Texture
-3.1: Use this texture : <i.imgur.com/XyUuY.jpg> – it's the main texture of the art. Set it Screen – 100% and dup it to Layer 5– screen – 100 % . Use Spatter 46 pixels's brush to erase with Zigzag's line in this texture, set it nearly with TAEYANG's bottom, make sure that you won't erase it much, just make it in naturally way.
- 3.2 : Create another whole new layer with color :#ff0000 and then set it into Screen – 100 % and move it to the banner. Move it to the space with lots of brush came from 2.1 and 2.2. Use Layer (main texture) dup again to Layer 7 – screen – 22 % , using the white light place in order to make that place which is you're designing look lighter and more shiny.
-3.3 : Use this texture : <i.imgur.com/HRtuj.jpg> – set it Lighten – 100 % in the centre of the banner.
-3.4 : Use this : <i.imgur.com/ajxVS.jpg> and use your light texture <whatever you like, of course, it has to be colorful and fit with your stock and banner's color. The 1st one set it Darken – 56 % (just use the number) The 2nd one set it Lighten – 100 % (just use the color of it)
4. Dup TAEYANG's stock and resize it into a small TAEYANG, move it to the top and on the right side. Use slide cut to make some cool line in his body,
5. Coloring ! Use whatever your coloring, But just make it more beautiful and not use burn coloring much because it would ruin your banner. It sucks Believe me.
6 Add texts and ENDs.
this is your artwork : fc02.deviantart.net/fs70/f/201…
Hope that you will learn something after this tutorial
Officially written by Krisswagg aka Klsunderground @ dA
DON'T COPY OR RE-WRITTEN WITHOUT MY PERMISSION.
{ This is a part of my designing style. So I just write it in a simple way to make sure that ya'll know clearly bout this}
THIS STYLE IS JUST ABOUT YOUR IMAGINATION AND Dos OF YOUR DESIGN. It's maybe not like my artwork but it's still have such common come from this style. Thanks.
Stock : BIGBANG'S TAEYANG. i.imgur.com/9yn2d.jpg
Texture : thanks @ dA
Brush : www.mediafire.com/?ww460dcukh8… ; www.mediafire.com/?d6rkb7cc982…
1. OPEN the stock(s). Use Pen Tool (L) or Quick Select Tool (W) to take the mod out of the backround. And then drag it into the position that you want it to. Named it : Layer 1.
2. Dup Layer 1 to Layer 2 and Layer 3. Layer 1 : normal – 100 % - sharpen. Layer 2 : normal – 100 % . Layer 3 : screen – 90 %.
* Layer 1 : Want to check the name of those brush : click to that brush that i gave you below -> rename this brush .
-2.1 : Use Pennello campione 1's brush – 400 with color #d13232 and put the first brush on the right side and brush once. Then go to the second right side near TAEYANG's right hand – brush another one. Make sure that you keep that Layer not being absolutely clear after erase piecies after done with the brushes.
-2.2: Use Sampled Brush 1563's brush - 400 Then use color: # 000000 and do whatever you like at the bottom of the mod. But do it slightly and not too much.
* Layer 2: < if you don't want to do anything with Layer 2 and just want it simple, so all you have to do is set it normal and doing nothing.> You have to erase almost all of the body of TAEYANG and you just have to use the right side of his body <include arms, legs and head. Use Pennello campione 2's – 400 with color # ad2626 and do it freely like 2.1.
3. Using Texture
-3.1: Use this texture : <i.imgur.com/XyUuY.jpg> – it's the main texture of the art. Set it Screen – 100% and dup it to Layer 5– screen – 100 % . Use Spatter 46 pixels's brush to erase with Zigzag's line in this texture, set it nearly with TAEYANG's bottom, make sure that you won't erase it much, just make it in naturally way.
- 3.2 : Create another whole new layer with color :#ff0000 and then set it into Screen – 100 % and move it to the banner. Move it to the space with lots of brush came from 2.1 and 2.2. Use Layer (main texture) dup again to Layer 7 – screen – 22 % , using the white light place in order to make that place which is you're designing look lighter and more shiny.
-3.3 : Use this texture : <i.imgur.com/HRtuj.jpg> – set it Lighten – 100 % in the centre of the banner.
-3.4 : Use this : <i.imgur.com/ajxVS.jpg> and use your light texture <whatever you like, of course, it has to be colorful and fit with your stock and banner's color. The 1st one set it Darken – 56 % (just use the number) The 2nd one set it Lighten – 100 % (just use the color of it)
4. Dup TAEYANG's stock and resize it into a small TAEYANG, move it to the top and on the right side. Use slide cut to make some cool line in his body,
5. Coloring ! Use whatever your coloring, But just make it more beautiful and not use burn coloring much because it would ruin your banner. It sucks
6 Add texts and ENDs.
this is your artwork : fc02.deviantart.net/fs70/f/201…
Hope that you will learn something after this tutorial
Join the community to add your comment. Already a deviant? Log In